This is a simple wire work chain to make, but very pretty. I wish I could remember where I learned this! I hope you enjoy it, and have fun!
 |
| Chain from the front. |
 |
| Chain from the side. |
 |
| What you need: Round nosed pliers and a supply of wire. I have pre-cut 22 gage, copper wire into 1 inch lengths. |
 |
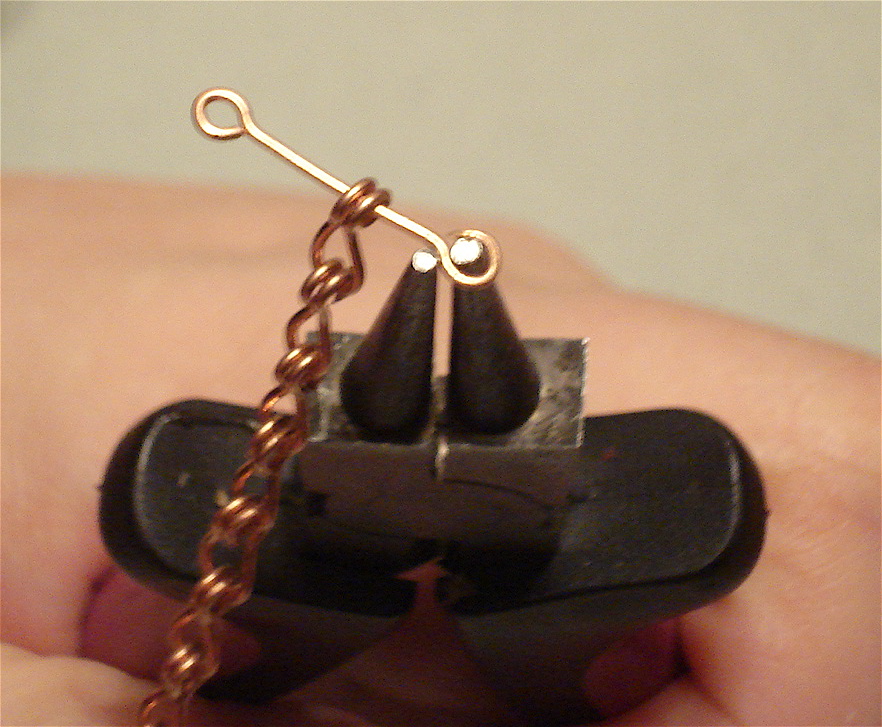
| Grab near the end of the wire with the tip of the pliers. |
 |
| Roll the wire around the tip, until it forms a loop. |
 |
| Turn the pliers around, so that they are positioned opposite of the end of the loop. |
 |
| Bend back the wire, forming a nice balanced "simple loop". |
 |
| Repeat on the other side, wrapping the loop in the opposite direction. |
 |
| Squeeze the loops *gently but firmly* in the flat part of the pliers. Flattening them slightly will help harden them, making them stronger. You don't want to over squeeze,and munch them out of shape. |
 |
| Hold the center about 1/2 down your pliers. This insures that the link will be wide enough so that the looped ends can move freely on it. |
 |
| Bend the looped ends back until they touch. Keep the center balanced. |
 |
| Place the looped ends in the flat part of your pliers. |
 |
| Squeeze gently until they meet. |
 |
| Voila! You have your first link! |
 |
| Add to the chain by placing the wire through the loop ends before making the second loop. Repeat! |
Good job on the tutorial. I can't believe this is your first one. I love this chain.
ReplyDeleteAgreed! She made practical,simple, lovely link-bling which will be a component for my necklace-earrings set here in Texas. :-)
DeleteThank you Dana! It means a lot coming from you, since I know you write such great tutorials yourself!
ReplyDeleteWow, great link and lovely tutorial!
ReplyDeleteThanks Rhea!
ReplyDeleteGreat tutorial Kia!
ReplyDeleteThank you!
Amber
Awesome tutorial, Kia! Thanks so very much for posting it...I'll have to give it a try sometime when our new kitty is sleeping, as she's into EVERYTHING.
ReplyDeletexo
Debbie
===^..^===
Great tutorial, Kia! Very professional, with excellent photos. Thanks for posting it!
ReplyDeleteThe tutorial was great and very professional and the photos were the most professional I have seen.
ReplyDeleteWow! Thank you all! I should really credit my husband, Alex Ramsey, with taking the photos. His support has been invaluable. He has spent the last 9 months teaching himself photography, and is really getting good. Glass is hard to get good pictures of. Before this, I was using my scanner to take pictures!
ReplyDeleteKia - super job on the tutorial, and Alex - super job on the pics! Well done, Kia - thank you!
ReplyDeleteGreat tutorial, Kia! It's different from the way I make this type of chain but it's always good to take in other ideas. Well done!
ReplyDeleteWabbit? Do you have a tutorial up? I'd love to learn from you, too!
ReplyDeleteI am making this right now but in silver plated 22 mil. . It is very fine and light weight . So very easy to do. Thank you for the tut.
ReplyDeleteThanks for the comment, Jayne. : ) It is light, but still strong. I bet silver looks great!
DeleteVery nice chain and tutorial!
ReplyDeleteThank you!
Fraisiperles
Montreal, Canada
love this...straight forward, easy to understand. Thanks for sharing!
ReplyDeleteI can't wait to try this! Great job on the tutorial and on the chain. I always pre-cut my wire too. It makes the project so much quicker that way.
ReplyDeleteBest -
Lisa
http://www.lisayangjewelry.com
Thank you so much!! I've been looking for something like this for a really long time
ReplyDeleteand this is perfect!
Thanks for the idea !
ReplyDeleteI have a business on Etsy ; Margie's Natural Jewels and I make most of my chains. Some I buy when I need to get it listed . I want to eventually make all my chains and I love this one and I will also hammered the links to give them texture . Love It !!!!
Thanks
Margie
This is a great job. I am going to try this. Thank you for the idea.
ReplyDeleteGotta make this. Great tutorial thanks
ReplyDeleteEspectacular, excelente, gracias
ReplyDeletegreat work, I have just started making jewellery ,love your page ,I have made some knitted items from your patterns, thanks so much .
ReplyDeleteAmazing! I love it; it will be on my very next project
ReplyDeleteGreat job on your tutorial. Yes, your husband did a great job on the photography, but you gave him what to shoot and you explained the steps quite well.
ReplyDeleteAt first I wasn't sure why you'd loop the wire ends in opposite directions, but then I realized it must be to strengthen the chain overall.
Thanks so much for the beautifully done tutorial.
Great tutorial!I wanted to know what kind of round nose pliers are you using? thanks
ReplyDeleteI struggle with understanding tutorials often, so I wanted to leave a quick thank you for writing one that even I found simple to follow!!
ReplyDeleteMahalo :-)
Thanks for your tuto, it is great! Oh Lord I'm doing it right! Uhu!
ReplyDeleteMy first loops are perfect. How do you get the subsequent loops to not be mis-shaped by the previous loop?
ReplyDeleteHi Kia
ReplyDeleteI JUST tried your tutorial... I LOVE the chain! Your directions were so clear <3 My chain turned out perfectly symmetrical because of your wonderful directions.
Love this tutorial. Will be trying it today.
ReplyDeleteHi! I found this chain on an inexpensive vintage charm bracelet. I made a sample and then found your tutorial. On the bracelet the tail of the component was simply folded back--a more down 'n' dirty way to go.
ReplyDeleteVery cute. Practice makes perfect - right??? I tried with a thicker gauge but it didn't work so I used a 20 gauge and it worked real nice. Thank you so much for sharing your awesome technique. I LOVE IT!
ReplyDeleteI only started making copper braclet's a few months ago. I am hooked! !! Thanks for sharing , helps me a lot!!
ReplyDelete