Sunday, December 18, 2011

Recent Jewelry Projects


Now that I'm getting time away from the torch, I'm having fun actually making things with my beads! Sadly, our camera seems to have suffered a scratch to the lens, so I apologize for the haze. 


This is my first custom piece. The customer chose the glass colors to match a special dress. 

Wirework has been calling me lately. I made this for myself, including the jump rings. It has no clasp as I can easily just slip it over my head. I figure I should have some of my own stuff to wear! 
This is how it hangs. The Cranberry pinks and greens make a great necklace for the Holidays. I expect the copper wire will patina nicely. 

But wait! There's a bracelet too! 

I'm very proud of the wirework clasp I made for the bracelet. 

Blue swirled glass on stainless steel wire. This is a necklace to go in the shop...

...with matching earrings. 
Hangs like so. 

Friday, December 16, 2011

Tutorial: Making Wire Work Chain

This is a simple wire work chain to make, but very pretty. I wish I could remember where I learned this! I hope you enjoy it, and have fun! 

Chain from the front.

Chain from the side.

What you need: Round nosed pliers and a supply of wire. I have pre-cut 22 gage, copper wire into 1 inch lengths.

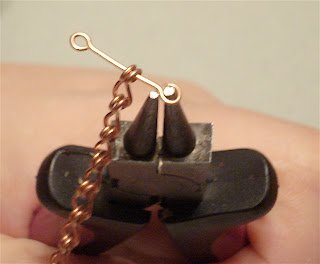
Grab near the end of the wire with the tip of the pliers.

Roll the wire around the tip, until it forms a loop. 

Turn the pliers around, so that they are positioned opposite of the end of the loop.

Bend back the wire, forming a nice balanced "simple loop". 

Repeat on the other side, wrapping the loop in the opposite direction. 

Squeeze the loops *gently but firmly* in the flat part of the pliers. Flattening them slightly will help harden them, making them stronger. You don't want to over squeeze,and munch them out of shape.

Hold the center about 1/2 down your pliers. This insures that the link will be wide enough so that the looped ends can move freely on it. 
Bend the looped ends back until they touch. Keep the center balanced. 

Place the looped ends in the flat part of your pliers.

Squeeze gently until they meet.

Voila! You have your first link! 

Add to the chain by placing the wire through the loop ends before making the second loop. Repeat!  


Hollow Vessels

Ah well, it has become too cold to work out in the Glassebo for the time being. When your fingers get numb, and you can see your breath when your face is a foot away from the flame...  it's time. I'm just glad I was able to get my last couple of projects finished. For the "Holiday Ornaments" swap, I decided to make tree-light inspired Hollow Vessels. 

Making Hollow Vessels is a bit like making a coil pot, but out of glass. You coil a thin string of glass off the end of the mandrel and build it out in a bubble shape. If you do it right, you don't get any gaps in the layers. Once you close of the end and then heat it evenly, it does a neat puffing thing as the air in the bubble expands.  It took a few tries, but I got the hang of it. 


This was my first successful Hollow Vessel. You can really see the hollow in it in this picture, but in person, it's a very dark glass. 

I also learned to make the wire-wrapped dropper and chain for this project. Green went nicely. 

But, red was the winner! These were the charms I sent out.

I started playing around to see what I could do with beyond "lightbulb" shapes.  Decorating is going to take more practice, but this is the largest, most hollowest vessel I was able to make. 


And finally, a proper Hollow Bead. This is made by coiling up two disks, spaced near each other on the mandrel, and then joining them. The hole goes all the way through!  I was hoping that the dark glass  in the center would let enough light through to show that it's transparent purple, but no such luck. Still I'm happy with my efforts.  


Sunday, October 30, 2011

Florence Turnour's Diamond Net bead necklace w/ my lampwork beads!

Check out this fabulous necklace by my friend Florence Turnour. She used a mix of my Cased Bubble lampwork beads, and her gorgeous, mathematcitally based, Diamond Net beads. You can find kits and patterns for her beads at BeAdInfinitum.  Enjoy!!


Photo and necklace by Florence Turnour

Oh! And she wrote it all up on her blog!

Monday, October 17, 2011

Rubino Oro Success!

I think I finally got the hang of Rubino Oro!  This "cranberry" or "ruby gold" glass gets it's color from real gold. It's kind of difficult to work with, and after several tries finally I finally turned out this batch. These are for a friend, but I think I'll have to make more.


These are "stacked dot" beads, mostly. There is a poked bubble up there and a solid color bead, from when I was just messing around. Black base, layered Oro Rubino over white, with random transparent pink center dot.  What worked was working further out in the flame, with more oxygen. I needed to let the beads get fairly cool before reheating them to bring the color up. It took a few repeats to get it good and dark.

Wednesday, October 5, 2011

Cased Bubble Focal Beads

These charms are made with the cased bubble focal beads that I made the other day. They are the favorite colors of the contest winners.

Turquoise
Dark Lilac                    

Slate Blue

Candy Apple / Lime


Monday, October 3, 2011

It's been a busy couple of weeks. I spent last weekend with Peg Krzyzewski at Art & Soul, in Portland, OR.  She was teaching "Art Charm Buffet", and I got to assist! It was a lot of fun, and the class went very well. Peggy is such a kick, too!

I've been able to get out in the "Glassebo" more often lately. These beads are for swaps with the ArtCharms group, but people have been going nuts over the kitties, so I'm going to make more. The eyes are silver!

"Practical Cats"

"Missing: Linus"


"Dead Man's Party"

The above are for the Halloween Swap, and the following for the Purple / Green Swap. 


"Purple / Green "

Friday, September 9, 2011

Mario Bros. Coins

Last night in chat at ArtCharms, there was a "challenge" suggested; to make a blog post before tonight. Good as any reason to get going!

For the last month, I've been working on charms for a ( my, I'm hosting ) swap, on the theme of "Video Games". My 14 year old son also joined in. His charms are Mario Bros. coins. Great idea! We decided to make 30 of them, so there would be enough left over to make a fun necklace, too. What a great homeschooling project. 

We talked about different ways to make the coins, and in the end decided on layers of card stock, glued together and painted gold, with a nice clear coat of Diamond Glaze. Kiddo learned to make nice wire wrapped loops, and how to attach jump rings. He painted and glued, ( I did the cutting. ) and they looked great. 

Super, until the last step. The Diamond Glaze reacted with the gold paint, and they turned greenish. So we repainted them gold, this time with spray paint, figuring that the enamel would keep it from reacting. Wrong.  Spray painted again, and tried Glossy Accents this time, since it doesn't say that it's water based. Less reaction, and it took a couple of days. One more coat of paint. 

I ask the Artcharms group for advice. Epoxy resin is the answer. I've never worked with real epoxy before, but I'm game. What started out as a learning opportunity for Kiddo suddenly became one for me as well! 

So, I'm at the grocery store, and I see Superglue makes epoxy that comes in a handy two piece syringe thing, that measures it out evenly. Cool. I buy it. I use a plastic spoon to mix some in, and do a test. It comes out lovely, and smooth and hard, but you can see the detail inside. The yellow color works in our favor. 

We get down to work, with Kiddo measuring out the epoxy mix into the plastic spoon, and me mixing quickly and pouring it on the coins. It hardens really quickly, so I didn't want to make a bunch at once. Little did I know that you can't use the same mixing thing more than once with some epoxy. They all turned out sticky. I put some Diamond Glaze over that, and it took care of that! 

Now the coins are slightly domed on one side. They didn't want to sit still for the other side, and i had some issues with them tipping and spilling and then sticking to the mat, requiring further coats to clean them up. They are getting pretty thick by this point. Coating the edges added more dimension. Now they look like they've been dipped in epoxy...  but it's not bad. Considering that we got them finished the day the last set from the swap arrived, I'm okay with them. Since then, I've learned that there are "art grade" epoxies. My friends recommend the one carried by Little Windows. It doesn't set up so fast, and you can reuse the mixing container.

These are the best ones, getting sent out for the swap.