Friday, March 30, 2012

Koi Pond Pop-Up Book!

  "Koi Pond" Tiny Pop-Up Book by Kia Dallons


It's been months since I've been able to get out in the Glassebo! First project was to make bunch of koi fish, to embellish my Tiny Pop-Up Books. 

Koi in the rinsing trey. The pondiness amused me.
Not to mention my string of fishies. : D


Book jacket, before.  I used some of Elizabeth Dawson's lovely hand-dyed fabric, which reminded me of water, and applied it to cardboard with Aleene's Tacky Glue. When dried, it has a nice glossy, wet look to it. 

Lilly pad progression. I drew the initial pad,  scanned and printed out a sheet of them.  Then I used Caran d'Ache Neocolor II  water-soluble crayons to fill each one in, and coated with clear, spray-on epoxy. 


Lotus progression. I used the template from Robert Sabuda's collection. Printed on typing paper for the translucent quality,  and clear coated, after adding color. 

And that's how it was done.  : ) 


Saturday, February 18, 2012

Tutorial: Needle Felted Bead with Craft Felt


Tutorial: Needle Felted Bead with Craft Felt, by Kia Dallons


"Strange Quark"  Needle felted and embroidered bead.  Craft felt, wool roving, metallic embroidery thread.

I made these for the "Celestial" theme swap.  They have a black craft felt base, with purple and blue wool roving. For this tutorial, I decided to go with red, because it would photograph more clearly.

You will need: Craft felt, wool roving, felting needle, metallic embroidery thread. 
Start with a triangle of craft felt.  This one is 1 1/4" x 8", which worked down into a 1/2 x 3/4" bead when it was done.  It doesn't have to have smooth edges, or be a perfect triangle.  Roll the felt up, as shown above. Try to keep it as centered as possible.  Next you need a felting needle.
Felting needles have tiny barbs along the shaft, which tuck the fibers together. They are sold in packs to be loaded 3 or 4 at a time into special holders, but I like to use them individually for detail work. They are very sharp! Be careful not to poke yourself!
Starting just below the tail of your wrap, push the needle part way into the bead to secure the felt. Repeat every 1/4" or so around the center of the bead until you tack down the "tail" last. Avoid pushing all the way through, and directly  through the very center, as you don't want to close your hole.
It should look somewhat like this when you are ready for the next step.
From the end. You can see the felt is tightly rolled.
Work one end of the bead at a time. I already tacked down one end of this one. As you can see, the felt pushes out more to the side you are not working on. This will correct itself when you do the other side, but don't let it get too far out of whack. 
How to work down the end: Starting at the edge of the inner most wrap and working around the spiral toward the hole,  gently tack just the edges down. Point your needle at an angle towards the middle. You will need to repeat this a number of times, so don't try to work it all down in the first pass.
You can see the first round is getting narrower.

Eventually, you will end up with a little rim around the hole. The first side that was tacked down is now getting pushed out a bit. The needle marks the center. By this time, you should not be able to see the edges of the wrap very much, as they get blended in and tucked down. 
Viewed from the end. Next, define the holes. Open the hole up a bit, and spread the edges out. You will need to occasionally ream out the hole with the felting needle while you are working, to keep it clear. 

Working at an angle, and close to the surface of the bead, tack the edges away from the hole. 
Now define the hole even more, by working from the inside towards the outside. Work it down until the edges are no longer visible. 
It should look like this. 
Now, jab the bead all over with the needle. Repeat until the surface is uniform, and you like the shape. If you want, you can call it done at this point, or add other embellishments, but if you are planning to add roving, don't worry about making the bead look finished at this point. 
This is wool roving bought from a craft store. It comes in a small package, and unfolds. Another great place to find roving is your local yarn store. You only need a small amount, like the small tufts shown in the foreground of the photo. Also shown is the package/box of felting needles.
Roll the roving a bit between your palms to get it to make a loose rope.  Wrap around the bead. I like to start at the hole, so that it's easy to keep track of where it is, but it's up to you.
Tack it down. I'm using a multi-needle holding tool for this. It's not necessary, just faster. 
You can make bends and swirls by tacking a spot and then wrapping a different direction.

Once you are happy with the design, go over it again with the needles and get everything pretty well stuck on there.

Pretty hairy! 
Next, I added a layer of red roving over the black, and tacked it down.

Ready to jab a million times. Once the roving is pretty well on, I switch back to the single needle for better control. 
Keep on jabbing! Remember to keep the hole open.
Eventually it will become very firm, as all the fibers get tucked down. I could have kept going, making it smaller and less fuzzy, but I liked it like this.
From the end. 
I added some metallic embroidery ( which is hard to see in the pic ), and put it on a head pin with some beads.  Finis! 

Monday, January 16, 2012

Tiny Pop-Up Books

I am a book lover, and I have always been fascinated with pop-up books. In my secret heart, I've always wanted to write a pop-up book. I hoard broken pop-up books, just so I can take them apart to see how they work...   

Last year, I received a tiny 1"x1" pop-up book in an ArtCharms swap. It was a lucky rabbit, for the Chinese New Year. I was instantly enchanted, and had to try for myself. I found Robert Sabuda's Website full of free pop-up templates, and chose the castle. A little shrinking in Photoshop, and viola. Not bad for a prototype.  


Inside. I painted it with my new metallic watercolors to try them out. I like them very much. 
Exterior. A bit rough. The heart is made of Friendly Plastic, from when Peggy Krzyzewski came to visit last fall. The title, "Love Will Light Every Room" is a line from a beloved camp song called "Castles". ( We don't live in a castle, but love will light every room. The stars that shine in your eyes and mine, are bright as the glowing moon. )

~

"Happy Little Bushes, Ode to Bob Ross"  This was my trade for the first Tiny Pop-Up Books Swap. I used the castle template, but redrew it as a landscape.  This is also painted with the metallic water colors. I made the beads, and the hand dyed ribbons are by Debbie Metti / Kitten Creates.  ( Her Etsy Shop


Oh, but I wasn't done. For the "Video Game" swap, I used the same castle template, and altered it to make a pop-up based on the old-school Frogger cabinet arcade game, just like the one I played down at Bob's Burger Express as a kid. 

Alex found a copy of the game, and then played untill we could get screen shots of the important elements. A little cut-n-paste, and we're good to go. Just have to say, Photoshop rocks.  Dig the beaded joystick. 

By the way, I'll be hosting another Tiny Pop-Up Book swap over at ArtCharms, if anyone wants to join in. Sign-ups start Feb 1, 2012.

Sunday, December 18, 2011

Recent Jewelry Projects


Now that I'm getting time away from the torch, I'm having fun actually making things with my beads! Sadly, our camera seems to have suffered a scratch to the lens, so I apologize for the haze. 


This is my first custom piece. The customer chose the glass colors to match a special dress. 

Wirework has been calling me lately. I made this for myself, including the jump rings. It has no clasp as I can easily just slip it over my head. I figure I should have some of my own stuff to wear! 
This is how it hangs. The Cranberry pinks and greens make a great necklace for the Holidays. I expect the copper wire will patina nicely. 

But wait! There's a bracelet too! 

I'm very proud of the wirework clasp I made for the bracelet. 

Blue swirled glass on stainless steel wire. This is a necklace to go in the shop...

...with matching earrings. 
Hangs like so. 

Friday, December 16, 2011

Tutorial: Making Wire Work Chain

This is a simple wire work chain to make, but very pretty. I wish I could remember where I learned this! I hope you enjoy it, and have fun! 

Chain from the front.

Chain from the side.

What you need: Round nosed pliers and a supply of wire. I have pre-cut 22 gage, copper wire into 1 inch lengths.

Grab near the end of the wire with the tip of the pliers.

Roll the wire around the tip, until it forms a loop. 

Turn the pliers around, so that they are positioned opposite of the end of the loop.

Bend back the wire, forming a nice balanced "simple loop". 

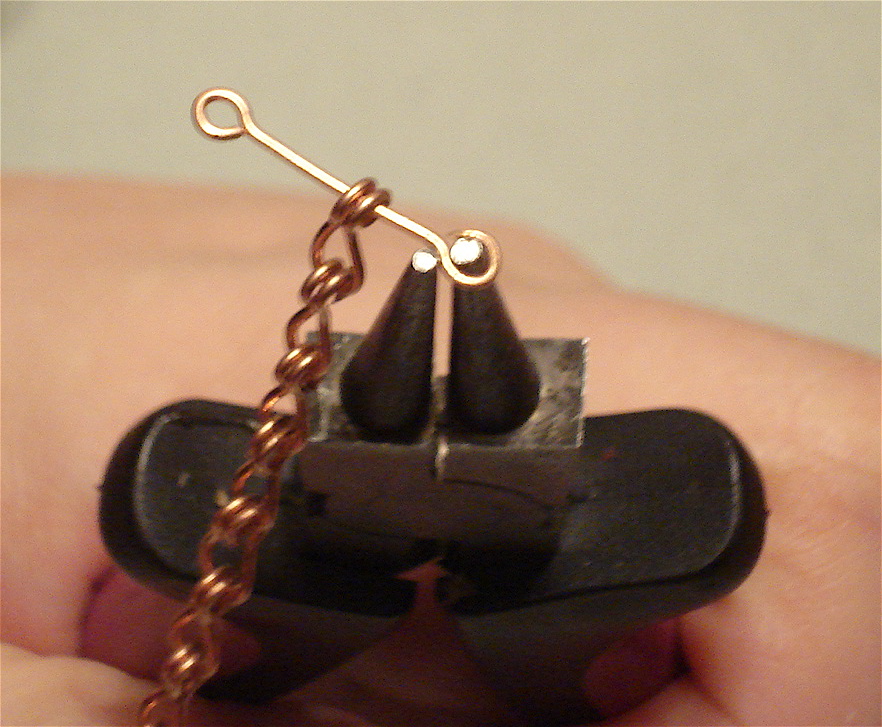
Repeat on the other side, wrapping the loop in the opposite direction. 

Squeeze the loops *gently but firmly* in the flat part of the pliers. Flattening them slightly will help harden them, making them stronger. You don't want to over squeeze,and munch them out of shape.

Hold the center about 1/2 down your pliers. This insures that the link will be wide enough so that the looped ends can move freely on it. 
Bend the looped ends back until they touch. Keep the center balanced. 

Place the looped ends in the flat part of your pliers.

Squeeze gently until they meet.

Voila! You have your first link! 

Add to the chain by placing the wire through the loop ends before making the second loop. Repeat!